Hold the right button
Press and hold the secondary mouse button.
MOUSE WHALE / FIELD GUIDE For v2.1.3 · Beta
No complicated shortcuts to memorize. Hold the right mouse button, draw, and release. As you get comfortable, teach the whale your own moves.
Move the app into Applications, confirm the first-run security prompt, and grant permissions. Follow the illustrated steps below.
Download the friends-and-family beta ZIP, extract it, and drag Mouse Whale.app into your Applications folder. Because this build is not Apple Developer ID signed or notarized, macOS may ask you to confirm opening it in System Settings → Privacy & Security → Open Anyway. No Terminal commands are required.
Download beta ZIP ↓Go to System Settings → Privacy & Security → Accessibility and allow Mouse Whale. macOS may request Automation permission for certain actions.
This early beta is not yet signed with Apple Developer ID or notarized. macOS may show a warning on the first launch. Proceed only if you trust the file and its source.
Unzip the download, then drag Mouse Whale.app into the Applications folder in Finder. Do not launch the copy sitting in Downloads.
Double-click Mouse Whale.app in Applications. If macOS offers “Move to Trash,” do not select it. Close the warning with Done.
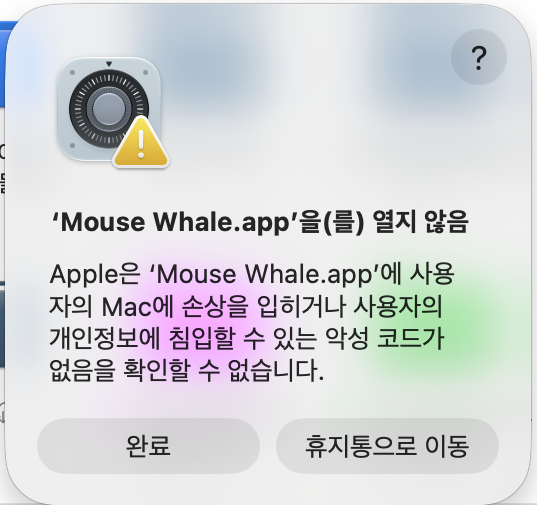
Immediately go to System Settings → Privacy & Security, scroll to the Security section, find the message that Mouse Whale was blocked, and choose Open Anyway.
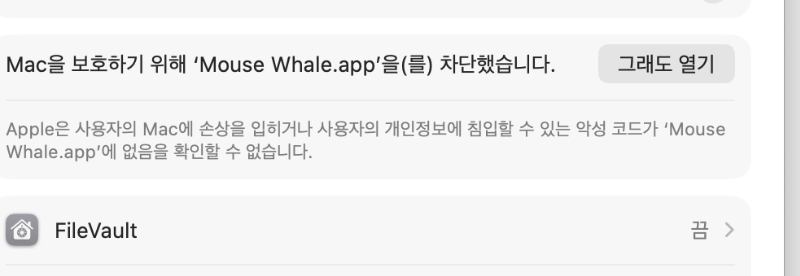
Authenticate with your Mac password or Touch ID, then choose Open in the follow-up dialog. Allow Accessibility permissions when prompted.
ⓘ Security note: Use Open Anyway only for an app obtained from a source you trust. You never need to disable macOS security globally or run Terminal commands. This beta does not yet include an automatic Applications installer.
There are only three steps. Give it a try.
Press and hold the secondary mouse button.
Make a directional gesture or a letter you have taught the whale.
Mouse Whale performs the action assigned to that gesture.
Two gestures are enough to begin.
For example, ←↑ opens a tab; →↓ minimizes a window. That is plenty for your first swim.
Hold the right button, draw, then release. These are the built-in gestures in Mouse Whale 2.1.3.
In browsers: go forward. In other apps: next track. YouTube Music prioritizes music controls.
In browsers: go back. In other apps: previous track.
Open a new browser tab. ⌘T
Sends ⌘W to the active window. In a browser, closes the current tab.
Send the frontmost window to the Dock without quitting its app.
Quit the active app. Unsaved changes may trigger a confirmation.
Move the scroll area under the pointer toward the top.
Move the scroll area under the pointer toward the bottom.
Move down and immediately up without pausing.
Draw down, pause briefly, then up. Windows slide aside. Your macOS shortcut must be configured.
Capture a selected region of the screen. ⇧⌘4
Draw a clockwise circle to open macOS System Settings.
Scroll the wheel while holding right-click to change volume by 5%. Direction can be reversed.
Press the middle mouse button while holding right-click to toggle playback.
Shake left and right to show the built-in gesture help.
A middle click launches region capture. If your mouse has no middle button, use ↑↓.
i Gestures depend on the active app and your system settings. Trained alphabet gestures run the actions you assign.
The fun starts here. Teach the whale your handwriting, then assign a favorite app or website.
For example, draw M to open Music. The stroke does not have to be perfectly straight.
In the menu bar, click the whale icon and choose 문자 인식하기 · A~Z (Recognize Letters).
Choose a letter and select 필체 3번 가르치기 (Train handwriting 3 times).
While holding the right mouse button, draw the same letter in one stroke three times.
Choose 실행 앱 선택 (Select app) or 웹사이트(URL) 지정 (Set website URL).
Teach C and O yourself.
Since v2.1.3, counterclockwise circles do not launch a default app. You can train O for Notes and C for Chrome. Clockwise ↻ still opens System Settings.
Whale Sync is a beta feature that shares trained A–Z gestures and their app/URL assignments through a cloud-synced folder.
On the first Mac, use the whale menu → Whale Sync · 설정 공유 → 새 공유 시작 · 1호기 최초 등록, then pick a dedicated synced folder.
On the second Mac, choose 기존 공유에 참여 · 다른 맥 from the same menu and select that same folder.
While running, Mouse Whale checks changes about every 30 seconds. Cloud syncing may take additional time.
Whale Sync shares trained strokes and app/URL assignments. Accessibility/Automation permissions, Show Desktop shortcuts, and volume-wheel direction must be configured on each Mac.
If the same letter is edited on multiple Macs simultaneously, the last change may win. Back up settings first. Local backups are saved at ~/Library/Application Support/Mouse Whale/SyncBackups/
Most problems can be narrowed down by checking permissions, recognition, or Mac-specific settings.
You do not need to memorize everything. Start with a single gesture you like.